How to Install Node.js on Ubuntu 24.04: A Step-by-Step Guide
 Liutauras Morkaitis
Installing Node.js on Ubuntu is simple when you follow these reliable and straightforward methods outlined in this guide.
What Is Node.js?
Node.js is an open-source and cross-platform JavaScript runtime environment. It allows you to run JavaScript code outside of a web browser, like on a server for programming purposes. It’s built on the V8 JavaScript engine (the same engine that powers Google Chrome). Moreover, it’s designed for building scalable, high-performance, and event-driven applications.
The Benefits of Node.js
- Node.js runs on the V8 engine. So, this JavaScript runtime environment architecture makes JavaScript execution highly efficient on the server.
- It handles multiple requests simultaneously without blocking I/O. This process improves performance for high-traffic applications.
- It’s ideal for building microservices-based architectures.
- It also comes with Node Package Manager (NPM). NPM provides access to thousands of open-source libraries for faster development.
- Node.js easily integrates with databases like MongoDB, MySQL, and PostgreSQL.
- Node.js has a large, active community, ensuring continuous updates, security patches, and extensive documentation.
Prerequisites for Installing Node.js on Ubuntu
Firstly, you need a Linux server running locally or accessed remotely. Alternatively, you can also get Linux VPS Server Hosting if you don’t own a Linux server or you’ve outsourced the hardware requirements to the virtual private server providers.
Secondly, you’ll need root access to install Node.js system-wide. However, root access is not required if you’re installing it in a user directory.
How to Install Node.js Manually on Ubuntu Using Snapcraft
Snapcraft is the canonical source for the latest Node.js runtime for most of the Ubuntu distributions.
It provides a graphical user interface for installing this popular JavaScript runtime on a Linux client or server. Moreover, it offers the conventional Linux CLI command sudo snap install node –classic approach to install Node.js.
On Ubuntu 24.04, Snap daemon or support is available by default. However, if you’re using a Ubuntu distribution of anything earlier than Ubuntu 16.04 LTS, you’ll need to go to the Installing Snap on Ubuntu portal and install the necessary support files.
Now that you’re ready to install Node.js, follow these steps on your Linux computer:
- Open Chrome or Firefox on your Ubuntu machine and visit the Node.js Runtime on the Snap portal.
- Click on the Version selection drop-down arrow in the top right corner of the page.
- Hover the mouse cursor over the latest Node.js runtime file and click on the Install button.

Node.js Runtime
- You’ll now see the Install 22/stable of Node.js Runtime page.
- Click on the View in Desktop store button.
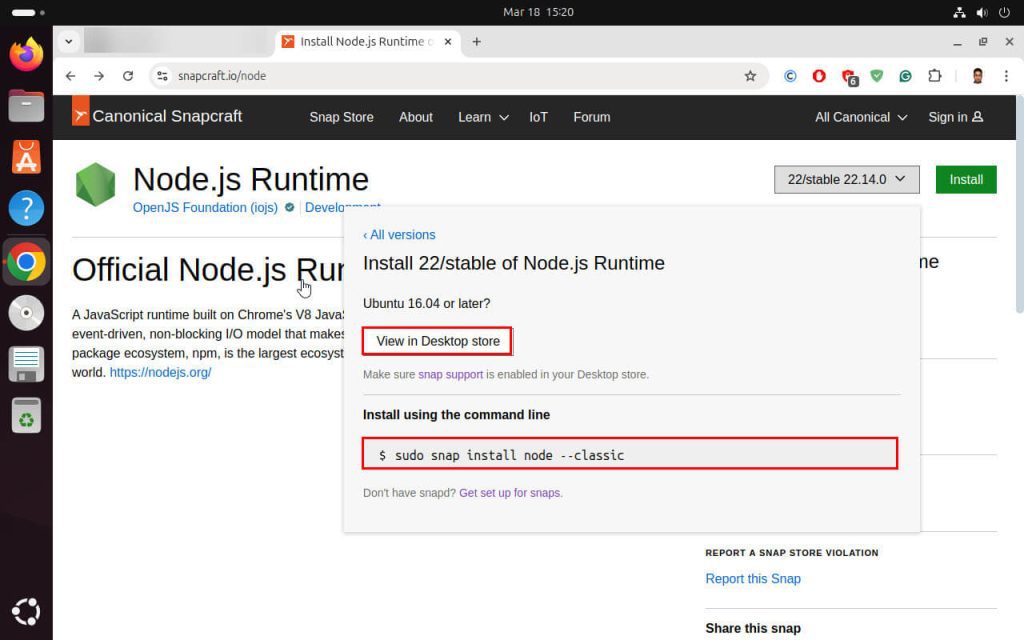
View in Desktop store
- The Open Handler for snap pop-up will show on the top of the Chrome browser. Click on that.
- App Center will open and redirect you to the Node.js Runtime screen.

Node.js Runtime screen
- Click on the Install button and follow the onscreen instructions to complete the Node.js runtime installation process.
If you prefer installing the runtime using Ubuntu Terminal, follow these steps instead:
- Click on the Show Apps icon in the bottom left corner of the Ubuntu desktop screen.
- Open the Terminal app by clicking on its icon.

Open the Terminal
- Type in the following command into the Terminal app and hit Enter:
$sudo snap install node --classic- Wait for the Terminal app to contact the Node.js server to download and install the runtime.

sudo snap install node
Installing Node.js on Ubuntu Using NVM
NVM or Node Version Manager is another good way to install Node.js on Ubuntu. However, this is strictly a command-based approach. The main reason to use this method is because NVM allows you to install and manage multiple Node.js versions and switch between them effortlessly.
It also avoids root access issues by installing Node.js in the user’s home directory. Also, it enhances project supportability since it prevents issues with Ubuntu’s system-wide Node.js version. Moreover, you can quickly update or downgrade Node.js without affecting the entire system.
Here are the steps you can follow:
- Open the Ubuntu Terminal app and run the following script:
curl -o- https://raw.githubusercontent.com/nvm-sh/nvm/v0.39.4/install.sh | bash- Now that the nvm script has been installed in your user account, run the following command to source the .bashrc file.
source ~/.bashrc- Close the Linux Terminal and start it again from the Show Applications menu on the Dock of the Ubuntu system.
- Run the following script to ask NVM to list all the available Node.js runtimes:
nvm list-remote- To install a Node.js runtime version from the list that opens, for example, v18.9.1, use the following script:
nvm install v18.9.1- Whenever you wish to check the Node editions you’re using, you can execute this script:
nvm listInstalling Node.js and NPM With APT
In Linux Ubuntu, APT (Advanced Package Tool) is a command-line package management system used to install, update, upgrade, and remove software packages, including Node.js.
Let me walk you through the process below step-by-step:
- Open the Terminal app on your Ubuntu client or server and run this script:
sudo apt update- Once the APT command is updated, install Node.js by executing this script:
curl -fsSL https://deb.nodesource.com/setup_18.x | sudo -E bash -- Once the repository is added, install Node.js by executing this script:
sudo apt install -y nodejs- You can verify whether the installation has been successful or not by running this script:
node -v- It shows the current Node.js package of the Ubuntu machine.
Testing and Verifying Node.js Installation
The simple way to verify if you’ve got Node.js on your Ubuntu machine or not is by running any of the following Linux Terminal commands:
node -vIt returns the currently installed Node.js version, like v18.16.1.
Alternatively, you can run this command as well:
npm -vIt’ll return a version number, like 9.5.1.
To test the functionality of the currently installed Node.js runtime, follow these steps:
- Open the Terminal app and run this command:
nano test.js- Add the following content:
console.log("Node.js is working!");- Save the file by pressing Ctrl + X, then press Y, and finally hit Enter.
- Now, run this script:
node test.js- If the Node.js installation is working, the Terminal will flash this message:
Node.js is working!
FAQs About Node.js Installation on Ubuntu
How do I install Node.js on Ubuntu?
You can install Node.js on Ubuntu using any of these methods:
- Installing via APT (default repository)
- Setting up through the NodeSource repository
- Managing with NVM (Node Version Manager)
- Getting it from the Snap package
- Compiling from source
What is the easiest way to install Node.js on Ubuntu?
The easiest way to install Node.js on Ubuntu is through the Snapcraft portal. However, many Ubuntu experts prefer using NVM because it allows version switching and prevents permission issues.
How do I install NVM on Ubuntu for Node.js?
Here’s how you can install NVM (Node Version Manager) on Ubuntu to manage Node.js versions easily:
- Update package lists using this command:
sudo apt update- Download and install NVM using the official script:
curl -o- https://raw.githubusercontent.com/nvm-sh/nvm/v0.39.4/install.sh | bash- Reload the shell configuration to apply changes by running this command:
source ~/.bashrc - Verify NVM installation by executing this script:
command -v nvm - Finally, install Node.js using NVM:
nvm install nodeCan I install Node.js using APT?
Yes, you can install Node.js using the APT (Advanced Package Tool) command. The simple command you can run is sudo apt install nodejs.
What is the difference between NVM and APT installation methods?
The main difference is that NVM (Node Version Manager) allows you to install and switch between multiple Node.js versions, while APT (Advanced Package Tool) installs a system-wide version managed by Ubuntu’s package repositories.
How do I install NPM on Ubuntu?
You can install NPM (Node Package Manager) on Ubuntu using either APT or NVM based approaches. APT and NVM based methods are slightly different in the way that if you use the APT approach, you must run a separate code to install npm first.
If you’re using the apt command, try these scripts one by one:
sudo apt updatesudo apt install npmContrarily, if you wish to use NVM, run these codes one after the other:
curl -fsSL https://raw.githubusercontent.com/nvm-sh/nvm/v0.39.4/install.sh | bashsource ~/.bashrcnvm install nodeHow can I verify if Node.js is installed correctly on Ubuntu?
To verify if Node.js is installed correctly on Ubuntu, open the Terminal interface and run this script:
node -vOr
node --versionIf Node.js is installed correctly, it will return the installed version (e.g., v18.16.0). If not, you may see an error like command not found.